Simple Mistakes We All Make: Misusing Common Best-Selling Products
7. Two-liter bottle.
DIY Terrarium Using a Two-Liter Bottle Best Places to Shop:
Grocery Stores Costco Average Product Price: $1.48
Creating a terrarium is a fantastic pastime for both children and adults who enjoy gardening. It’s also a great way to repurpose and upcycle materials, helping to reduce plastic waste in landfills. Here’s how to make a beautiful terrarium using an empty, clean two-liter bottle.
Materials Needed: Empty two-liter plastic bottle Small pebbles or stones Activated charcoal (optional) Potting soil Small plants or succulents Scissors or a craft knife Decorative elements (optional) Instructions: Prepare the Bottle:
Carefully cut the two-liter bottle in half using scissors or a craft knife. You can choose to keep the top half as a lid or use both halves for different terrariums. Add Pebbles:
Place a layer of small pebbles or stones at the bottom of the bottle. This will help with drainage. Add Activated Charcoal:
If you have activated charcoal, add a thin layer on top of the pebbles. This helps keep the soil fresh and prevents odors. Add Potting Soil:
Fill the bottle with potting soil, leaving enough space for your plants. Plant Your Greens:
Choose small plants or succulents and plant them in the soil. Make sure to leave some space between them for growth. Decorate:
Add decorative elements like small stones, figurines, or moss to personalize your terrarium. Water Sparingly:
Lightly water the plants, being careful not to overwater. The closed environment will help retain moisture. Place in Indirect Light:
Position your terrarium in a spot that receives indirect sunlight. Conclusion Creating a terrarium from a two-liter bottle is a fun and eco-friendly project that promotes creativity and environmental awareness. It’s a great way to bring a bit of nature indoors while repurposing plastic waste. Enjoy your gardening adventure!
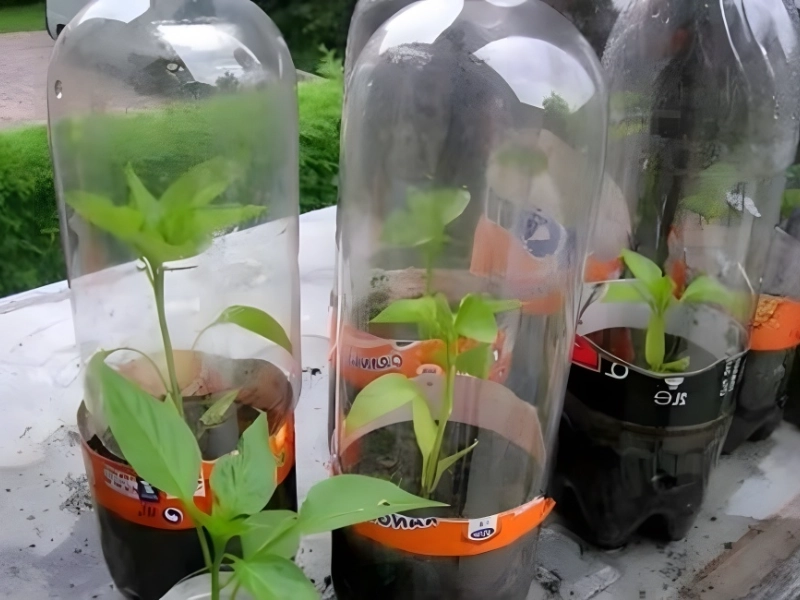
Two-Liter Terrarium Instructions
Creating a terrarium from a two-liter bottle is a simple and effective way to grow plants in a controlled environment. Here’s how to do it:
Materials Needed: Empty two-liter plastic bottle Potting soil Seeds (or small plants) Scissors or a craft knife Sunlight (for placement) Instructions: Cut the Bottle:
Carefully cut off the top of the two-liter bottle, about six inches from the bottom. Save the top for later use. Add Soil:
Fill the bottom half of the bottle with potting soil, leaving enough space for the seeds or plants. Plant Seeds:
Sprinkle your seeds on top of the soil or plant small plants, ensuring they are spaced appropriately. Reattach the Top:
Place the top half of the bottle back on the bottom half. This will create a greenhouse effect. Sunlight Placement:
Position your terrarium in a sunny spot where it can receive indirect sunlight. Conclusion The plastic bottle acts as a greenhouse, providing a humid environment that allows your plants to grow slowly but steadily. This DIY project is not only fun but also a great way to repurpose plastic while enjoying gardening!